You have opted for the convenience, security and aesthetics of our sliding gates to fit with your home entrance and time has now come for you to install your gate’s motor? We are here to guide you through the process. Whether you are a seasoned DIY enthusiast or a beginner, this step-by-step guide will help you successfully complete the installation.
Before diving into the installation process, it is important to fully understand the fundamentals of automatic sliding gates: how they work but most importantly how their motors work.
Fundamentals of sliding automatic gates
Sliding automatic gates open horizontally by gliding along a track. Their movement is powered and controlled by a motorised mechanism which ensures smooth and reliable operation while allowing you to open and close the gate effortlessly.
The motor is the heart of your sliding automatic gate system. This is why, when selecting a motor for your sliding gate, we recommend considering a few factors.
Firstly, you need to make sure that the motor is powerful enough to handle the weight and size of your gate. If the motor is too weak, it may struggle to open and close the gate, leading to potential malfunctions.
Additionally, the motor can be equipped with safety features such as obstacle detection and emergency stop functionality. These features help prevent accidents and ensure the gate operates safely in various situations.
Finally, it is important to note that regular maintenance of the motor is crucial to keep it in optimal condition. Lubricating moving parts, checking for loose connections, and cleaning the motor are some of the maintenance tasks that should be performed periodically.
Choosing a high-quality and reliable motor for your gate is necessary. It will not only enhance the performance of your gate but also provide you with years of trouble-free operation.
Installing your sliding automatic gate's motor: what you’ll need
Although installing a sliding automatic gate’s motor is doable by everyone, it requires a certain equipment and some safety measures to be taken to install your sliding automatic gate’s motor properly and safely.
Equipment:
In terms of equipment, here is a non-exhaustive list of tools you are likely to need to install your sliding automatic gate’s motor:
- A screwdriver set: from securing brackets to adjusting components, you’ll need different screwdrivers to comply different tasks throughout the installation process therefore having a comprehensive screwdriver set can come in handy.
- A power drill with appropriate bits for mounting brackets and other components. Make sure to have the appropriate drill bits for the type of material you will be working with.
- Concrete anchors to bolt your motor or any required component onto the concrete.
- A measuring tape to measure accurately and ensure your motor fits perfectly.
- A level to make sure everything is aligned and balanced. It will help you achieve a professional-looking installation by ensuring that your motor and your gate operates smoothly and without any hitches.
- A chalk or pencil for marking the positions of brackets, hinges, and other components. Make sure you use removable ones to be able to get rid of the mark after the installation.
- Cable ties can be needed to organise and secure the cables keeping them in place and preventing any potential hazards.
Safety first:
Throughout the whole installation process, make sure to keep yourself safe. To do so, here are some of the precautions we recommend you to take:
- Always wear safety goggles and gloves: safety goggles will shield your eyes from any debris or particles, while gloves will provide an extra layer of protection.
- Switch off the power to the gate before starting any work: turn off the power to your automatic sliding gate before you begin the installation to prevent any accidental activation of the gate while you are working on it.
- Follow the installation manual provided with your gate to ensure a successful and safe installation.
- Avoid wearing loose clothing that could get caught in moving parts: When working with any machinery or moving parts, it is crucial to avoid wearing loose clothing that could potentially get caught. Opt for well-fitted attire that allows you to move freely and safely.
Installing your sliding automatic gate's motor step by step
It’s important to note that installing a motor for an automatic sliding gate requires careful planning and attention to detail. This step by step guide should enable you to install your sliding automatic gate’s motor with ease.
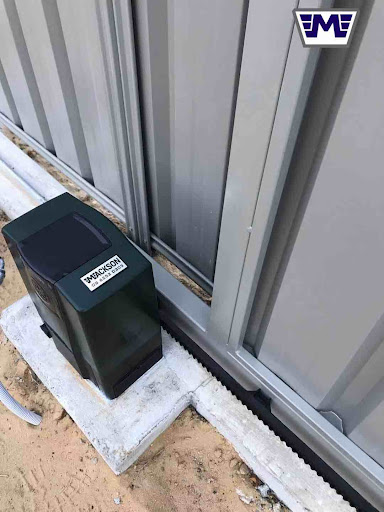
1. Positioning the motor
The first step is to determine the ideal position for the motor. This decision depends on various factors, such as accessibility, clearances, and the cable route.
Once you’ve chosen the perfect spot, use a level to verify the motor is positioned perfectly straight. This step is crucial as any misalignment can affect the gate’s movement and overall performance. If needed, make adjustments until you achieve the desired levelness.
Now, it’s time to mark the drill points using chalk or pencil. Take your time to ensure accuracy. Double-check the alignment before proceeding to the next step.
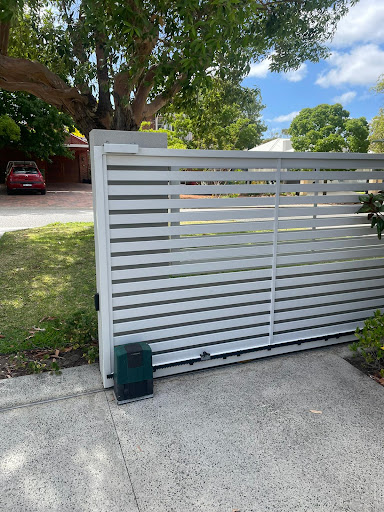
2. Connecting the motor
With the motor securely positioned, it’s time to connect it to the gate. This step may vary depending on the specific gate model, so it’s important to refer to your instructions manual. Coming with your specific gate, it will provide your with for the appropriate connection method.
Ensure all connections are secure and tight. Loose connections can lead to poor gate performance and potential safety hazards. Take your time to double-check the alignment and free movement of the gate before moving on to the next step.
Please note if you do not carry a valid certified Australian electrical licence you can not work on a gate motor that draws 240 volts. You must seek a qualified electrician to power the motor or opt for the low voltage motor kits instead.
3. Wiring the motor
Now that the motor is connected to the gate, the final step is to wire it up. To do so, gather the wires from the motor and connect them to the corresponding power supply. Refer to the instructions manual of your gate to make sure you respect the right colour-coding and prevent any potential electrical issues.
Once all the wires are connected, use cable ties to secure them and prevent tangling or accidental damage. Neatly organise the cables and ensure they are kept away from any moving parts of the gate. This step is crucial to maintain the longevity and smooth operation of the motor.
Caution: You need to hold a valid certified Australian electrical licence to wire a gate motor of 240 volts. If you don’t, please seek the help of a qualified electrician to power the motor or opt for low voltage motor kits to avoid hurting yourself or others.
4. Testing your installation
Time of truth has come! Now that you have completed the installation process, it’s time to test your automatic sliding gate’s motor.
This step is essential to make sure your motor and your gate operate smoothly and efficiently. Conducting an initial test run will allow you to identify any potential issues and address them promptly. This will help you avoid future inconveniences and maximise the performance of your gate.
A. Initial test run
Switch on the power to the gate and test its functionality. Observe the gate’s movement: Does it respond to your command? Does it open and close at the desired speed? Is the movement fluid and seamless? If any issues arise, consult your troubleshooting guide first.
B. Easy troubleshooting common issues
While automatic sliding gates are designed to provide convenience and security, some common issues may still be encountered. Here are a few tips that should enable you to fix them:
If the gate doesn’t move at all, check the power supply and connections. A loose or faulty connection can disrupt the flow of electricity and prevent the motor from functioning. On 240V motors, only qualified electricians can perform work on the connections.
If the gate moves but gets stuck, inspect for any obstructions along the track and remove them. Leaves, debris, or even small objects can impede the gate’s movement and hinder its performance.
If the gate moves slowly or jerks, ensure the track is clean and well-lubricated. Over time, dirt and debris can accumulate on the track, causing friction and affecting the gate’s smooth operation. Regular maintenance, including cleaning and lubricating the track, can prevent such issues.
Troubleshooting common issues is an essential part of maintaining your automatic sliding gate. By addressing these issues promptly, you can ensure the longevity and optimal performance of your gate.
Maintaining your sliding automatic gate's motor
The longevity of your sliding automatic gate’s motor highly depends on the level of maintenance it receives. Indeed, to keep it up to its optimal performance, we advise you:
- Regularly clean and lubricate: remove the dirt and debris that accumulates and lubricate part with the appropriate lubricant to ensure smooth operation.
- Periodically inspect: perform routine inspections on your gate’s motor to identify any signs of wear or damage. Address any issues promptly to prevent further damage.
By following these maintenance tips, you can prolong the life of your automatic sliding gate’s motor and ensure it continues to operate smoothly for years to come.
With this step-by-step we hope to give you the confidence and all information needed for you to tackle the installation for your automatic sliding gate’s motor. Remember to prioritise safety, and regularly maintain your gate’s motor to maximise its lifespan. Now that it is all settled, enjoy the convenience and security it offers!